The simplest method to customize clothes and make them your own is to put custom iron-on patches UK on them.
A basic understanding of how to properly place iron patches can make the contrast between a patch that lasts for years and one that tears off after just one wash, whether you’re finishing a set of club badges, marking staff clothing, or dressing up a denim jacket.
This guide covers every stage of the procedure, from selecting the ideal heat setting to repairing a patch that won’t adhere, along with fabric-specific tips, aftercare, and where to obtain premium bespoke iron-on patches that UK customers can trust for a polished finish.
What Are Iron On Patches and How Do They Work?
An iron-on patch is a fabric badge with a layer of heat-activated adhesive substance on the back that can be probably embroidered, woven, or chenille. The patch bonds itself to the strands of the fabric underlying it when glue reaches the right temperature and becomes soft and sticky-like. The glue becomes hard again after it gets cool, and keeps the patch stuck to the clothes during everyday wear.
Backing, material and finish all affect how much heat a patch can safely take, so it helps to understand the different iron on patch types and finishes before you start, since a thick chenille patch and a slim woven patch do not always need the same settings.
What You Need Before You Start
you can easily apply iron-on patches If you have a few basic things ready at home, :
- Regular iron with steam off. Or you can use a heat press for a stronger and more even bond if you have one.
- A heat-safe hard surface, like an ironing board or you can use a folded towel,
- a tea table towel or a thin cloth to protect the patch and your iron both.
- The iron-on patch, with some pins to hold it in place so it won’t move or heat-bearing tape will do as well.
- Needle and thread, matching with the patch. These can be used to sew the patch around the edges and make the patch extra secure after the glue is set after cooling.
How to Iron on Patches: Step by Step Instructions
These iron on patch instructions will work on most cotton, denim and polyester blend garments. Follow these in order for the strongest bond.
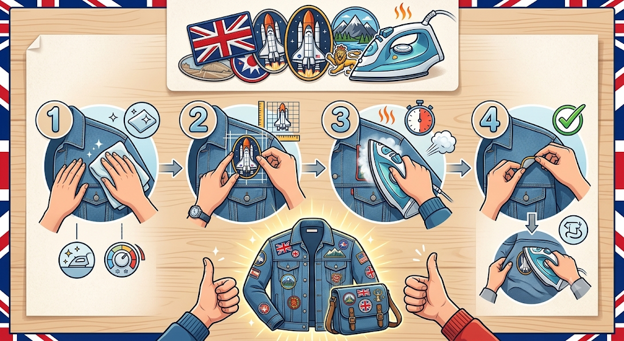
- Wash the garment and dry it first. Any fabric softener, dust or factory finish on new clothing can stop the glue of the patch from sticking properly on the fabric.
- set the iron to its cotton or wool setting with steam off. Let the iron to heat up fully for a minute or two before you start.
- Put the garment flat and decide on placement, where you want to place the patch. Pin the patch where you have decided to place the patch so it does not shift when you start ironing it.
- Put a pressing cloth on the patch to protect both surfaces from high heat.
- Press down for 25 to 30 seconds per section, do not slide the iron around, because it can shift the patch out from the place.
- Turn the garment inside out now and press the patch from the back for 15 to 20 seconds. Doing this can stick the patch more firmly
- Leave the patch flat to let it cool for a couple of hours or better overnight before you wear them or wash them
- Add a whip stitch if you want to or the clothes that you think you might use alot.
What Temperature and How Long to Iron a Patch
How much heat an iron on patch needs depends on the fabric underneath as much as the patch itself. Use this table as a starting point and always test on a hidden corner first.
| Fabric | Iron Setting | Time Per Press | Notes |
|---|---|---|---|
| Cotton | High / Cotton | 25 to 30 sec | The most reliable fabric for iron on patches |
| Denim | High / Cotton | 30 to 35 sec | Thicker weave needs firmer pressure and slightly longer press |
| Polyester blend | Medium / Synthetic | 20 to 25 sec | Watch for scorching, always use a pressing cloth |
| Nylon | Low to Medium | Not recommended | Prone to melting, stitch on or use a fusible sheet instead |
| Wool | Medium / Wool | About 25 sec | Use a pressing cloth to protect the fibres |
| Leather / faux leather | Do not iron | N/A | Use strong fabric glue or stitching instead of heat |
Iron On Patches on Different Fabrics and Items
Denim Jackets and Jeans
Denim is thick and holds heat well, which makes it one of the best surfaces for how to iron patches on jeans or a denim jacket. Press for 30 to 35 seconds and always press on the reverse side.
Cotton, Hoodies and Cotton Blends
Iron on patches look good on plain cotton t-shirts, tote bags and most hoodies. Put a folded-up towel under a hoodie with fleece linings so the iron presses evenly without the flattening of fabric.
Polyester Sportswear and Technical Fabrics
Polyester may burn or get brittle with high heat, so the best bet for safety is a medium setting and a pressing cloth. If the item is a performance fabric that can not be ironed directly, sewing on the patch is the better way to go.
Nylon, Waterproofs and Backpacks
Nylon melts easily, so direct ironing is not advised. For backpacks, check the inner lining is not heat sensitive, iron from the inside where possible, or choose a patch with a sew on or hook and loop backing instead.
Hats, Jackets and Uniforms
Caps and other curved surfaces are more difficult. Turn the cap as you press in small parts using the iron’s tip. A heat press or professional application provides a flatter, more durable finish for jackets, workwear, and school uniforms. Many businesses purchase custom embroidered patches pre-fitted with the backing that matches their clothing.
How to Make an Iron On Patch Stay On for Good
- Press the iron on the patch, from both the front and the back, not just the front
- Put a little pressure on the iron rather than the weight of the iron alone
- Leave the patch cool completely and untouched before moving the garment
- Sew the border of the patch around with a whip or blanket stitch, especially on bags, jackets and workwear that flex or get pulled
- Do not fold the garment where the patch is attached
Troubleshooting: Why Won’t My Iron On Patch Stick?
| Problem | Likely Cause | Fix |
|---|---|---|
| Patch will not stick at all | Iron not hot enough, or fabric slightly damp | Reheat fully, confirm the fabric is dry, press for longer |
| Corners keep lifting | Uneven pressure across the patch | Go back over each edge individually with the tip of the iron |
| Patch peeled off after washing | Washed before the adhesive fully cured | Wait 24 to 48 hours, then wash inside out on a cool cycle |
| Adhesive not melting | Steam switched on, or heat setting too low | Turn off steam and increase to the cotton setting |
| Patch came off in the dryer | Tumble dried on high heat | Air dry where possible, or tumble dry on low heat only |
How to Wash and Care for Clothes With Iron On Patches
- 24 to 48 hours after application, iron-on patches can be washed.
- Do not use fabric softener, it softens the layer of iron glue.
- Turn the garment, reverse side out
- Wash with cold water with a mild machine cycle.
- Dry patches in natural air.
once you know the right method, so there is no need to worry about a sticky mark being permanent.
How to Remove an Iron On Patch
If you want the patch to come off, removing the leftover adhesive residue from the fabric afterwards is easy, so you need not worry:
- To lift a patch, cover it with a cloth.
- Reheat it with the iron until the glue melts again.
- then peel it back gently from one corner with a sharp tool.
- then you can remove the residue with a nailpolish remover or ice method easily.
Frequently Asked Questions
How do I use iron on patches for beginners?
Start with a plain cotton garment, because it is iron on patch friendly fabric and it does not burn easily with high heat.
How do I apply an iron on patch without an ironing board?
A flat, firm, and heat-safe surface is best. The solid support required for uniform pressure is provided by a hardwood table covered with a folded towel or a kitchen worktop.
How do I apply a large iron on patch?
Instead of attempting to cover the entire patch at once, press it in overlapping chunks. Spend 20 to 25 seconds on each part as you work outward from the center, then finish with a full press on the back.
How do I apply iron on patches safely without damaging clothes?
Always use a pressing cloth, keep the iron moving in presses rather than dragging it, and test the fabric on a hidden seam first if unsure how it reacts to heat.
Can iron on patches go in the washing machine?
Yes, once the adhesive has cured for at least 24 hours. Wash inside out on a cool, gentle cycle for the longest lasting results.
Can you tumble dry clothes with iron on patches?
It is safer to air dry them. If a dryer is used, select a low heat setting to avoid softening the glue.
How long do iron on patches last?
Applied correctly and cared for properly, most iron on patches last for years of normal wear and regular washing.
Should you sew around an iron on patch?
It is not essential but it is recommended for items that see heavy use or flexing, such as backpacks, jackets and workwear, where stitching adds a permanent backup to the adhesive bond.
Can you use a normal iron for patches, or do you need a heat press?
A normal iron is perfectly capable for individual items. A heat press suits bulk or business orders better, where consistent pressure and temperature across many patches matters more.
What is the difference between iron on patches and iron on badges?
The terms are used interchangeably in the UK. Iron on badges UK sellers list are generally the same heat activated patches, just marketed under a different name.
Is there a minimum order for custom iron on patches UK?
No. Eagle Patches UK produces custom embroidered iron on patches for single items and small teams as well as large bulk orders, with pricing that scales to the quantity needed.
Getting Your Iron On Patches to Last
Three things are important when you want to apply an iron on patch by yourself, enough heat, enough time, and enough patience while the bond cools. Press both sides, follow the fabric specific timings, and give the adhesive a full day to cool before it goes in a washing machine or wearing.
For anyone who would rather start from a professionally made patch, Eagle Patches UK offers custom iron on patches, embroidered designs and bulk orders for businesses, clubs and teams all over the UK, backed by a free proof and design service on every order.